To remove a car headlight cover, first disconnect the battery to avoid electrical shock. Then, use a screwdriver or other tool to pry off the outer lens cover. Be careful not to damage the headlight bulb underneath.
Next, unscrew any retaining screws and pull out the headlight assembly. Finally, unclip the wires from the back of the headlight and remove the entire unit.
Easiest Way To Open Headlights [Separate Lens From Housing // All Cars] (w/Pro Tips)
- Open the hood of your car and locate the headlight cover
- Unclip or unscrew the fasteners that hold the headlight cover in place
- Gently pull off the headlight cover to remove it from the headlights
- If necessary, use a mild soap and water solution to clean any dirt or debris from the headlights before replacing the headlight covers
How to Remove Headlight Cover to Clean
It’s no secret that keeping your car clean can be a bit of a pain. But when it comes to cleaning your headlights, it’s important to make sure you do a thorough job. After all, your headlights are what help you see the road at night!
Fortunately, cleaning your headlights is relatively easy. All you need is a little soap and water and some elbow grease. Here’s how to do it:
1. Start by wetting down your headlight with some soapy water.
2. Use a soft cloth or sponge to scrub the lens in a circular motion. Be sure to get into all the nooks and crannies!
3. Rinse off the soap with some clean water.
4. Dry off the lens with a soft towel or cloth.
5. Repeat steps 1-4 on the other headlight!
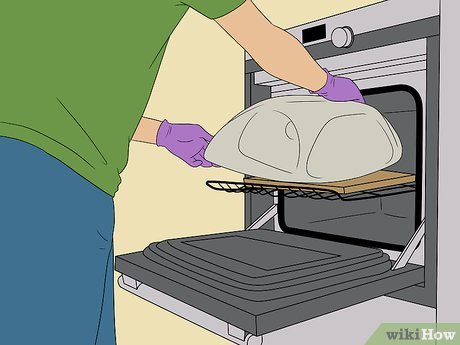
How to Remove Headlight Lens Without Oven
If you’re looking to remove a headlight lens without an oven, there are a few things you’ll need to do. First, locate the lens retaining ring. This is typically located near the back of the headlight housing.
Once you’ve found it, use a flathead screwdriver or pry tool to gently release it.
Once the retaining ring is released, the lens should come right off. If it’s being stubborn, you can try heating up the lens with a heat gun or hair dryer.
This will help loosen any adhesive that may be holding it in place.
With the lens removed, you’ll now have access to the bulb and socket. To remove the bulb, simply twist it counterclockwise and pull it out.
Headlight Lens Removal Tool
Are you looking for a headlight lens removal tool? If so, you’ve come to the right place. In this blog post, we’ll provide detailed information about headlight lens removal tools, including how to use them and what benefits they offer.
A headlight lens removal tool is a specialized tool that is designed to remove the outer lens of a headlight assembly. This type of tool is necessary because the lenses on most headlights are sealed with an adhesive that can be difficult to remove without damaging the lens.
There are several different types of headlight lens removal tools available on the market, but they all work in essentially the same way.
The tool consists of a handle with a sharpened edge that is inserted into the seam between the lens and the housing. The user then applies pressure to the handle, which cuts through the adhesive and allows the lens to be removed.
One of the main benefits of using a headlight lens removal tool is that it helps to prevent damage to the lenses during removal.
If done incorrectly, removing headlights can result in cracked or scratched lenses. A good quality headlight removal tool will have a sharp blade that can easily cut through even tough adhesives without damaging the underlying material.
Another benefit of using a specialized headlight lens removal tool is that it makes reinstallation much easier.
When reinstalling headlights, it’s important to get the alignment just right in order to avoid leaks and other issues.
How to Open And Reseal Headlights
If your car’s headlights are looking dull, it might be time to give them a good cleaning. But before you start disassembling your headlight housing, there are a few things you need to know. In this blog post, we’ll show you how to open and reseal headlights, so you can get back to driving with bright, clear lights.
First things first: before you do anything, make sure you have the right tools for the job. You’ll need a Phillips head screwdriver and a flathead screwdriver, as well as a bowl of warm water and some dish soap. If your headlight lenses are particularly dirty or oxidized, you may also need some sandpaper (600-grit is ideal) and/or a polishing compound.
Once you have everything gathered together, start by unscrewing the screws that hold the headlight housing in place. There will usually be three screws: two at the top of the housing (one on each side), and one at the bottom. Once all three screws are removed, carefully pull the housing away from the car body; if it’s stuck, gently wiggle it until it comes loose.
With the housing removed, take a look at the back of the headlight lens. If it’s extremely dirty or oxidized, use sandpaper to lightly buff away any buildup. Be careful not to scratch the lens too badly; just focus on getting rid of any roughness or discoloration.
Once you’re finished sanding (if necessary), wipe down both sides of the lens with a clean cloth soaked in soapy water; this will remove any leftover grit or residue from sanding.
Now it’s time to put everything back together again! Start by putting the lens back into place inside the headlight housing; then line up all three screws and screw them in tightly (but don’t over tighten them).
Can You Remove Headlight Lens Cover
If your headlight lens cover has become yellowed or hazy, it may be time to clean or replace it. Depending on the severity of the damage, you may be able to clean the lens cover and restore it to its original condition. However, if the damage is more severe, you will likely need to replace the entire lens cover.
Cleaning a Headlight Lens Cover
To clean a headlight lens cover, you will need:
-A soft cloth
-Water
-Mild soap
-A toothbrush or other small brush
-Rubbing alcohol (optional)
Rub the headlight gently with a soft cloth dampened with water. Add a drop or two of mild soap to the cloth and continue rubbing if needed.
Use a toothbrush or other small brush to scrub away any stubborn dirt or debris. Rinse the area well with water and dry with a clean cloth. Apply rubbing alcohol to a cotton ball and wipe away any remaining residue.
Allow the area to air dry completely before replacing any bulbs or covers.
Opening Headlights Car
Assuming you would like a blog post discussing how to open car headlights:
It’s happened to the best of us – you’re out in the middle of nowhere, trying to change a flat tire in the dark, and realize that you can’t see what you’re doing because your headlights are sealed shut. Or maybe you’re just trying to do some routine maintenance on your car and need to get to the headlight bulbs.
Whatever the reason, if you need to get into your car’s headlights, it’s not as difficult as it might seem. With a few simple tools, you can pop those headlights open in no time.
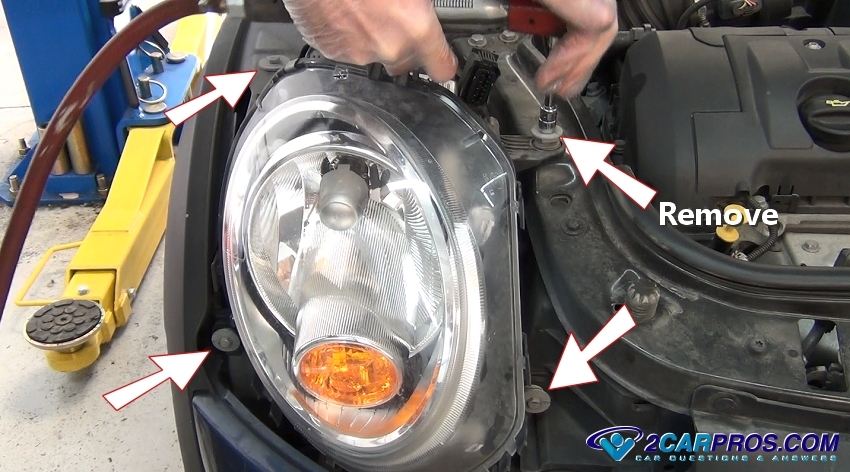
First, start by opening up your hood and locating the two screws that hold each headlight in place.
These are usually located near the top of the headlight assembly. Once you’ve found them, use a screwdriver or drill to remove them completely.
Next, locate the seam between the headlight housing and lens.
You should be able to see this seam even without taking off the screws; if not, gently pry open the housing with a small screwdriver or knife until you can see it. Once located, insert a thin piece of metal (a credit card will work in a pinch) into this seam and begin prying carefully until the lens pops off. Be careful not to crack or damage the lens as you do this – once it’s off, set it aside somewhere safe where it won’t get scratched or cracked further.
With the lens removed, you should now have full access to your headlight bulb(s). At this point, changing a burnt-out bulb is simply a matter of removing any necessary wires or covers (consult your car’s manual for specific instructions) and then unscrewing/pulling outthe old bulb before insertingthe new one and reassembling everything. And there you have it – easy access to your car’s headlights!
Headlight Lens Replacement Service near Me
If you’re in need of headlight lens replacement service, there are a few options available to you.
Headlight Cover Replacement Autozone
If your car’s headlight covers are cracked, yellowed, or otherwise damaged, it’s time to replace them! Headlight covers protect your headlights from debris and keep them looking good. Fortunately, replacing headlight covers is a relatively easy task that you can do yourself.
To replace headlight covers:
1. Remove the old headlight cover. This is usually just a matter of unscrewing a few screws.
2. Clean the area around the headlight with soapy water to remove any dirt or grime.
3. Place the new headlight cover in place and screw it in securely.
4. Repeat for the other headlight cover.
That’s all there is to it! Replacing your car’s headlight covers is an easy way to improve its appearance and keep your headlights protected from damage.
Credit: www.2carpros.com
How Do You Open a Headlight Cover?
Most headlights have a cover that can be removed for cleaning or replacement. The cover is usually made of clear plastic and snaps into place. To remove the cover, start by prying it up with a flathead screwdriver.
Once you’ve loosened the cover, pull it off by hand. If your headlight doesn’t have a removable cover, you can clean it with a soft cloth and soapy water.
How Do You Remove Old Headlight Covers?
If your headlight covers are looking old and dingy, you may be wondering how to remove them. Headlight covers can be made of plastic or glass, and each type has its own method of removal.
Plastic headlight covers can usually be pried off with a flathead screwdriver.
Start by gently inserting the screwdriver under one edge of the cover and prying it up. Once you have a small opening, you should be able to grab the cover with your fingers and pull it off. If the cover is stuck on tightly, you may need to use a heat gun or hair dryer to soften the adhesive before trying to remove it again.
Glass headlight covers are more delicate, so you’ll need to take extra care when removing them. Start by wetting a soft cloth with warm water and placing it over the headlight cover. This will help loosen any dirt or grime that’s built up on the surface.
After a few minutes, try gently wiping away any residue with the cloth. If the cover is still stubbornly attached, you can try using a razor blade to carefully scrape it off. Be careful not to scratch the underlying lens!
Can You Just Replace a Headlight Cover?
If your headlight cover is cracked or damaged, you may be wondering if you can just replace the cover instead of the entire headlight assembly. The answer is maybe. It depends on the severity of the damage and whether or not the seal between the headlight housing and the cover is still intact.
If the damage is just to the cover itself, then replacing it should be a fairly easy and inexpensive fix. However, if there is also damage to the headlight housing or seal, then it’s best to replace the entire assembly. This will ensure a proper seal and prevent any moisture or debris from getting into your headlights and causing further damage.
How Do You Clean the Inside of a Headlight Lens Cover?
Assuming you are referring to the headlight lens and not the entire headlight assembly, the following is a guide on how to clean the lens:
What you will need:
-A bucket
-Warm water
-Mild dishwashing soap or car shampoo
-A soft sponge or rag
-A glass cleaner (optional)
Instructions:
1. Park your car in a well-lit area so you can clearly see what you are doing.
It is also best to do this when the headlight lens is cool to the touch.
2. Fill your bucket with warm water and add a few squirts of mild dishwashing soap or car shampoo. Stir it around so it is mixed together well.
3. Dip your sponge or rag into the bucket and start lightly scrubbing the outside of the headlight lens in a circular motion. If there is any built up grime or bugs, you may need to apply a little more pressure. Be careful not to scrub too hard as you don’t want to scratch the lens.
4. Rinse off the headlight lens with clean water from your hose and dry it off with a clean towel . If there are any stubborn streaks, you can use a glass cleaner on them and wipe them away with a paper towel .
Conclusion
It’s not uncommon for a car’s headlight cover to become yellowed or discolored over time. While this may not affect the function of the headlights, it can certainly impact the look of your car. If you’re looking to restore the look of your headlights, then you’ll need to remove the headlight cover.
The process for removing a headlight cover will vary depending on the make and model of your car. However, in most cases, it will involve removing a few screws that hold the cover in place. Once the screws are removed, you should be able to gently pull off the headlight cover.
If there is any residual adhesive left behind, you can use a razor blade or putty knife to remove it.